> ## Documentation Index
> Fetch the complete documentation index at: https://docs.julep.ai/llms.txt
> Use this file to discover all available pages before exploring further.
# Quickstart
> Get started with Julep Open Responses API for LLM interactions
## Introduction
Julep's Open Responses is a self-hosted, open-source implementation of OpenAI's Responses API that works with any LLM backend. It provides a lightweight interface for generating content with Large Language Models (LLMs) without needing to create persistent agents or sessions.
To try it out, just run `npx -y open-responses init` (or `uvx`) and that's it! :)
### What is Open Responses?
Julep's Open Responses lets you run your own server that is compatible with OpenAI's Responses API, while giving you the freedom to use alternative models like:
* Anthropic's Claude
* Alibaba's Qwen
* Deepseek R1
* and many others ...
It's essentially a drop-in replacement that you control, with a permissive Apache-2.0 license. As an early release, we welcome your feedback and contributions to help improve it.
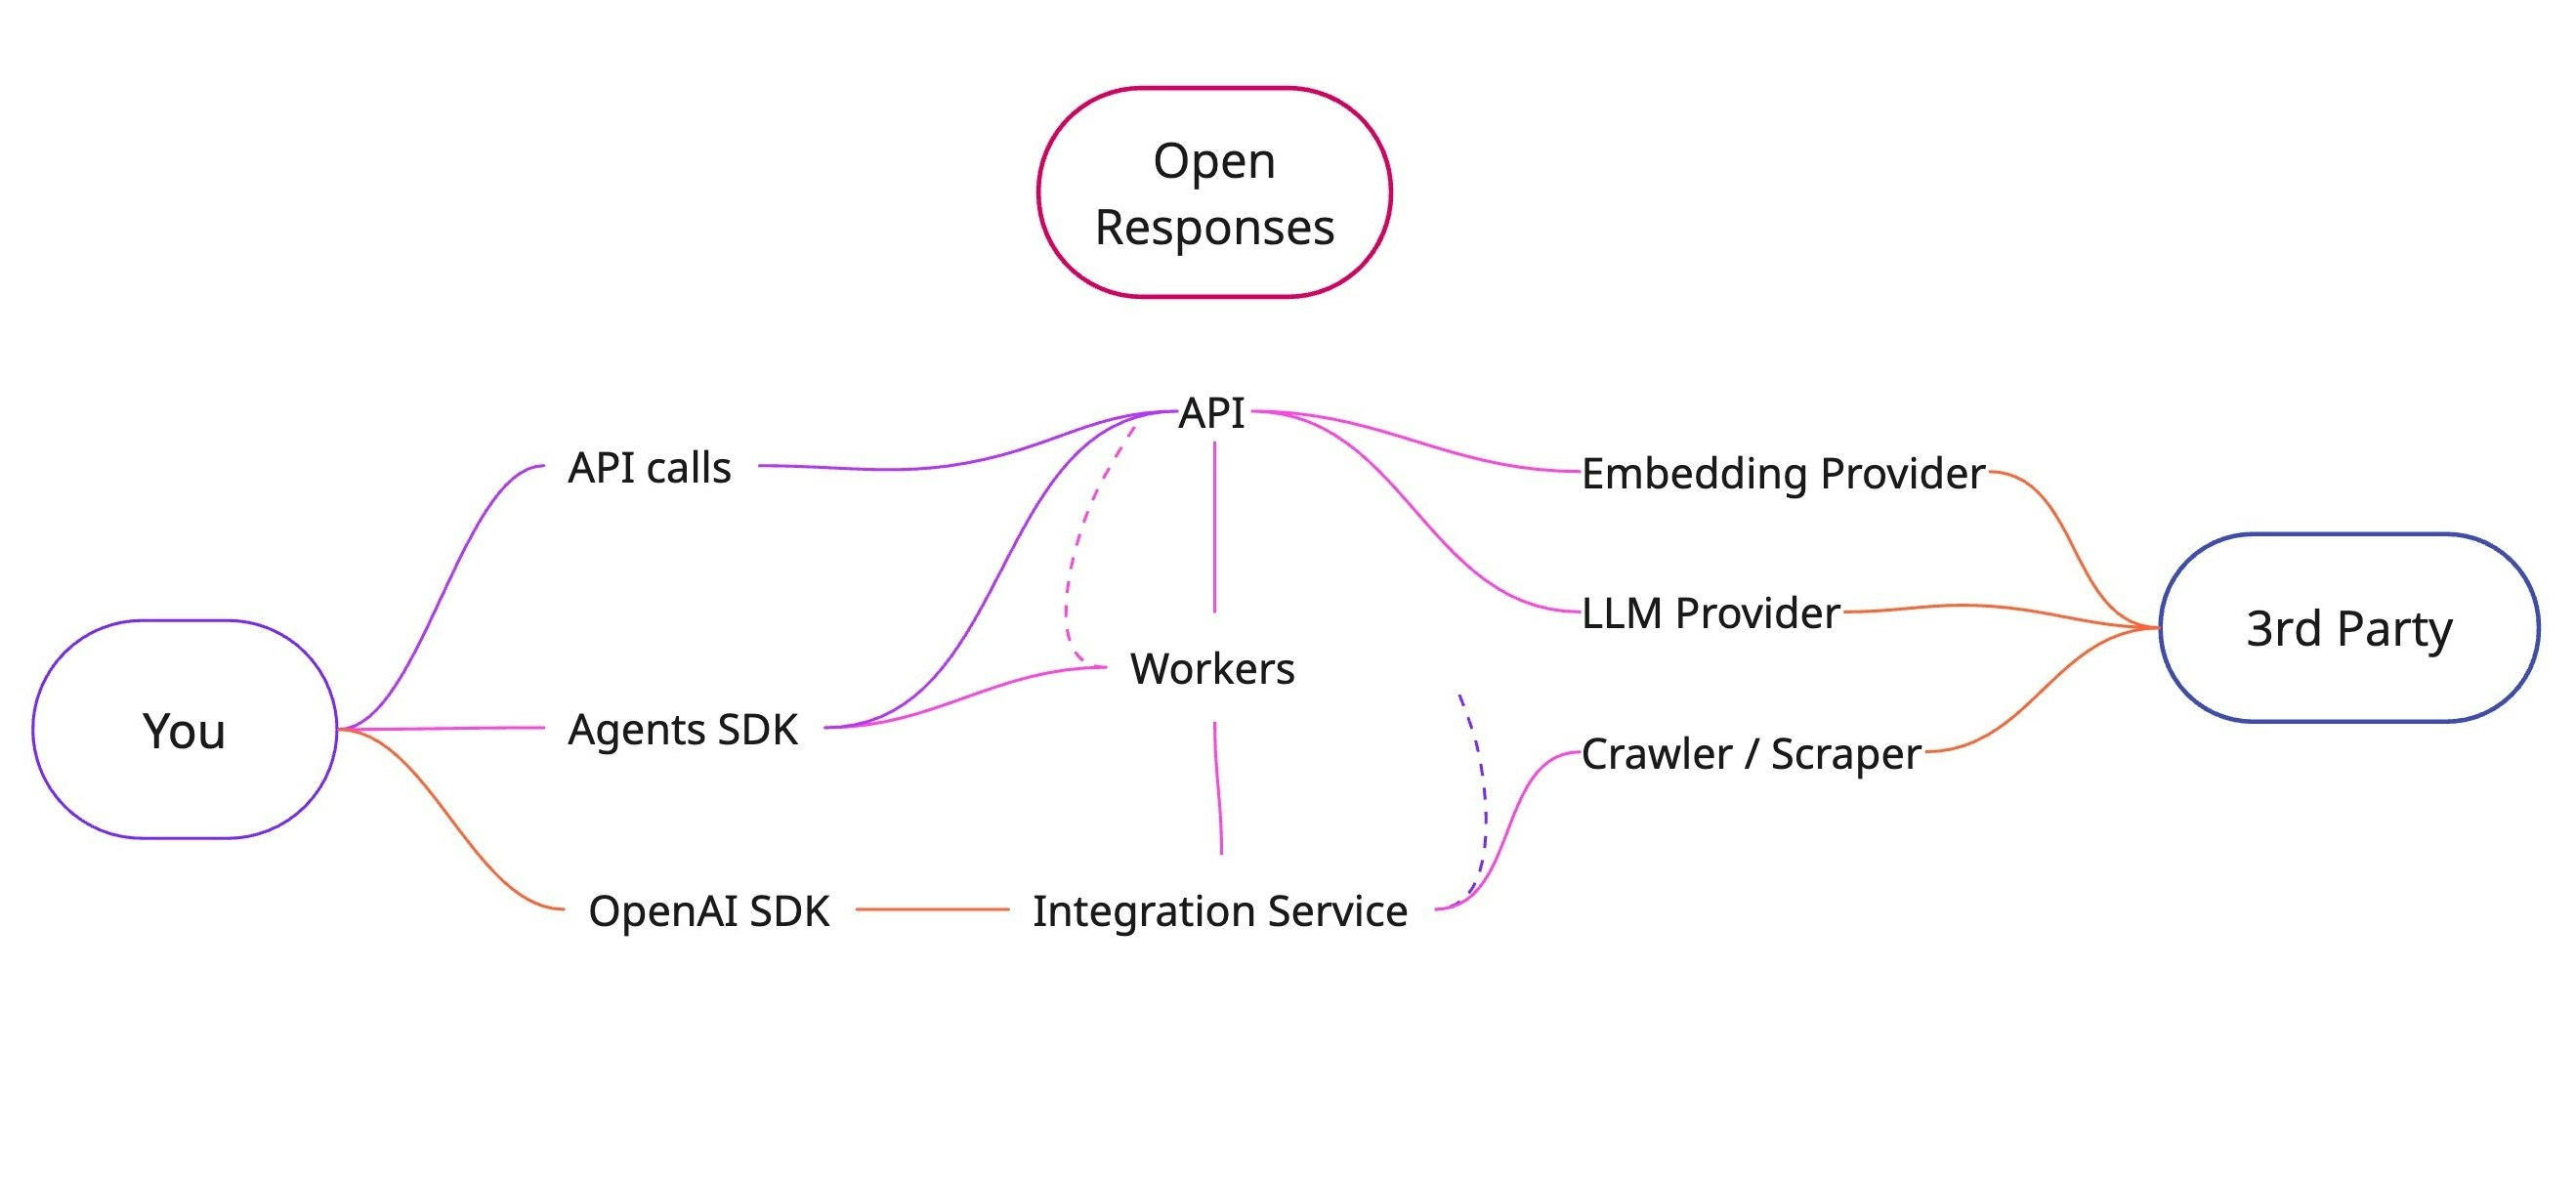 ### Why Open Responses?
* **Model Flexibility**: Use any LLM backend without vendor lock-in, including local model deployment
* **Self-hosted & Private**: Maintain full control over your deployment on your own infrastructure (cloud or on-premise)
* **Drop-in Compatibility**: Seamlessly integrates with the official Agents SDK by simply pointing to your self-hosted URL
* **Easy Deployment**: Quick setup via docker-compose or our CLI with minimal configuration
* **Built-in Tools**: Automatic execution of tool calls (like web\_search) using open & pluggable alternatives
- The Open Responses API requires self-hosting. See the [installation guide](#local-installation) below.
- Being in Alpha, the API is subject to change. Check back frequently for updates.
- For more context, see the [OpenAI Responses API](https://platform.openai.com/api-reference/responses) documentation.
## Local Installation
This section will guide you through the steps to set up the Julep's Open Responses API.
### Prerequisites
Install [Docker](https://docs.docker.com/get-docker/)
### Installation
The Julep's Open Responses API is a fully microservice-based architecture. It is fully dockerized and can be easily deployed on any infrastructure that supports Docker. There are two ways to install the API:
* [Docker Installation](#docker-installation)
* [CLI Installation](#cli-installation)
#### Docker Installation
```bash theme={"dark"}
mkdir julep-responses-api
```
```bash theme={"dark"}
cd julep-responses-api
```
```bash theme={"dark"}
wget https://u.julep.ai/responses-env.example -O .env
```
Edit the `.env` file with your own values.
```bash theme={"dark"}
wget https://u.julep.ai/responses-compose.yaml -O docker-compose.yml
```
Download the file to the current directory with the name `docker-compose.yml`. This is the file that will be used to run the Docker containers.
```bash theme={"dark"}
docker compose up --watch
```
This will start the containers in watch mode.
```bash theme={"dark"}
docker ps
```
#### CLI Installation
The CLI is a lightweight alternative to Docker for those who prefer not to use Docker directly.
Internally, it uses Docker to run the containers.
You can install the CLI using several package managers:
```bash npx theme={"dark"}
# Using npx directly
npx open-responses
# Or install globally
npm install -g open-responses
```
```bash uv theme={"dark"}
# Install using uv
uvx open-responses
# Install using pip globally
pip install open-responses
open-responses
```
```bash npx theme={"dark"}
npx open-responses setup
```
```bash uv theme={"dark"}
uvx open-responses setup
```
Before using any commands, you must run the setup command
```bash npx theme={"dark"}
npx open-responses start
```
```bash uv theme={"dark"}
uvx open-responses start
```
This will start the API in watch mode
To learn more about the CLI one can use the checkout the [CLI Documentation](/responses/cli).
## Quickstart Example
With the OpenAI SDK initialized, you can now use the Responses API to generate content.
### Why Open Responses?
* **Model Flexibility**: Use any LLM backend without vendor lock-in, including local model deployment
* **Self-hosted & Private**: Maintain full control over your deployment on your own infrastructure (cloud or on-premise)
* **Drop-in Compatibility**: Seamlessly integrates with the official Agents SDK by simply pointing to your self-hosted URL
* **Easy Deployment**: Quick setup via docker-compose or our CLI with minimal configuration
* **Built-in Tools**: Automatic execution of tool calls (like web\_search) using open & pluggable alternatives
- The Open Responses API requires self-hosting. See the [installation guide](#local-installation) below.
- Being in Alpha, the API is subject to change. Check back frequently for updates.
- For more context, see the [OpenAI Responses API](https://platform.openai.com/api-reference/responses) documentation.
## Local Installation
This section will guide you through the steps to set up the Julep's Open Responses API.
### Prerequisites
Install [Docker](https://docs.docker.com/get-docker/)
### Installation
The Julep's Open Responses API is a fully microservice-based architecture. It is fully dockerized and can be easily deployed on any infrastructure that supports Docker. There are two ways to install the API:
* [Docker Installation](#docker-installation)
* [CLI Installation](#cli-installation)
#### Docker Installation
```bash theme={"dark"}
mkdir julep-responses-api
```
```bash theme={"dark"}
cd julep-responses-api
```
```bash theme={"dark"}
wget https://u.julep.ai/responses-env.example -O .env
```
Edit the `.env` file with your own values.
```bash theme={"dark"}
wget https://u.julep.ai/responses-compose.yaml -O docker-compose.yml
```
Download the file to the current directory with the name `docker-compose.yml`. This is the file that will be used to run the Docker containers.
```bash theme={"dark"}
docker compose up --watch
```
This will start the containers in watch mode.
```bash theme={"dark"}
docker ps
```
#### CLI Installation
The CLI is a lightweight alternative to Docker for those who prefer not to use Docker directly.
Internally, it uses Docker to run the containers.
You can install the CLI using several package managers:
```bash npx theme={"dark"}
# Using npx directly
npx open-responses
# Or install globally
npm install -g open-responses
```
```bash uv theme={"dark"}
# Install using uv
uvx open-responses
# Install using pip globally
pip install open-responses
open-responses
```
```bash npx theme={"dark"}
npx open-responses setup
```
```bash uv theme={"dark"}
uvx open-responses setup
```
Before using any commands, you must run the setup command
```bash npx theme={"dark"}
npx open-responses start
```
```bash uv theme={"dark"}
uvx open-responses start
```
This will start the API in watch mode
To learn more about the CLI one can use the checkout the [CLI Documentation](/responses/cli).
## Quickstart Example
With the OpenAI SDK initialized, you can now use the Responses API to generate content.
API Key Configuration
* `RESPONSE_API_KEY` is the API key that you set in the `.env` file.
Model Selection
* While using models other than OpenAI, one might need to add the `provider/` prefix to the model name.
* For supported providers, see the [LiteLLM Providers](https://docs.litellm.ai/providers) documentation.
Environment Setup
* Add the relevant provider keys to the `.env` file to use their respective models.
### 1. Install the OpenAI SDK
```bash pip theme={"dark"}
pip install openai
```
```bash npm theme={"dark"}
npm install openai
```
### 2. Initialize the OpenAI client
```python Python theme={"dark"}
from openai import OpenAI
openai_client = OpenAI(base_url="http://localhost:8080/", api_key="RESPONSE_API_KEY")
```
```javascript Node.js theme={"dark"}
import { OpenAI } from 'openai';
const openai_client = new OpenAI({ baseURL: 'http://localhost:8080/', apiKey: 'RESPONSE_API_KEY' });
```
### 3. Generate a response
```python Python theme={"dark"}
import os
from openai import OpenAI
openai_client = OpenAI(base_url="http://localhost:8080/", api_key=os.getenv("RESPONSE_API_KEY"))
response = openai_client.responses.create(
model="gpt-4o-mini",
input="How many people live in the world?"
)
print("Generated response:", response.output[0].content[0].text)
```
```javascript Node.js theme={"dark"}
import { OpenAI } from 'openai';
const openai_client = new OpenAI({ baseURL: 'http://localhost:8080/', apiKey: "RESPONSE_API_KEY" });
const response = await openai_client.responses.create({
model: "gpt-4o-mini",
input: "How many people live in the world?"
});
console.log("Generated response:", response.output[0].content[0].text);
```
## Next Steps
You've got Open Responses running – here's what to explore next:
* [Learn more about the Open Responses API Examples](/responses/examples) – To learn how to use the Responses API with code examples
* [Learn more about the Open Responses API Roadmap](/responses/roadmap) – To see upcoming features including:
* [Learn more about Julep](/introduction/julep) - To learn more about Julep and its features
* [GitHub](https://github.com/julep-ai/julep) - To contribute to the project